

The
TECNO Camon C9 is the latest and un arguably the most beautiful camera
phone in the brands history. Among its awesome speculations are 13
Megapixel front and back camera, dual flash, eye scanner, T-Band, etc.
The
5.5 inch IPS display device features a 2GB of RAM, which is pretty
decent at multitasking. It runs on Android 6.0 Marshmallow and has a
3000MAH battery. However, the eye scanner on the device is the purpose
of this review.
In
a bid to improve the security provided by the device, the eye scanner
was built. I have heard and read lots of reviews about it, then I
decided to test if it is merely a gimmick or a perfectly good idea.
The
eye scanner is located in the ‘security and management’ section of the
settings on the device. It is termed ‘Eyeprint Verification’. On opening
it, you will be asked to input your password for identification; and
passwords can only be four digits.
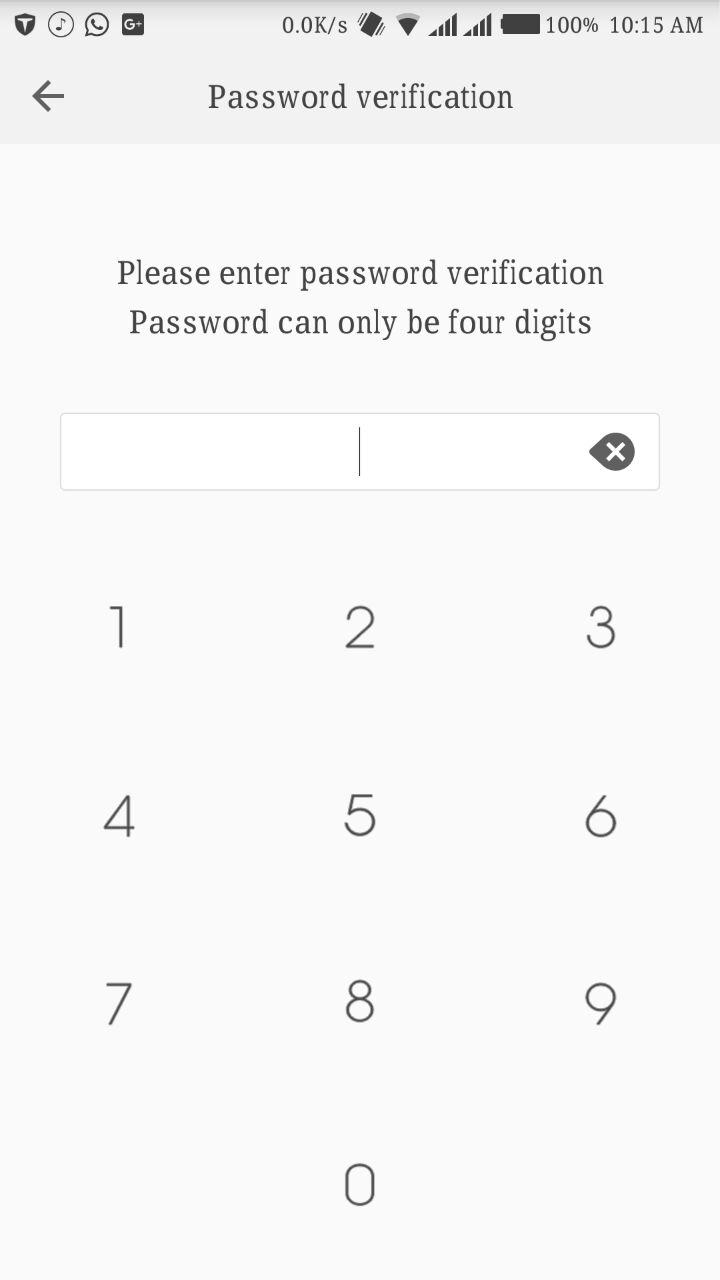
Immediately you are identified, the eyeprint manager is launched, and by clicking it, this is seen;
You
are told to re-register or delete eye print, after which the method of
the eyeprint verification is revealed. On launching it, you will be told
to register it in a well-lit and stable environment, face smartphone
directly and place eye within frame. However, the distance between the
face and mobile is 30cm the use of glasses is not recommended.
Hello people, today I have been getting so many request about
group building and explaining one by one from one student to the other,
so i have decided to drop the tutorial here simply for the sake of
fellow bloggers and also those that wish to create and sell to
interested persons, so today article will strictly be on how to create a
huge facebook group with an easy and fast procedure.
Detailed procedure on how to build a facebook group
-now before we begin, visit facebook.com and input the details of the account which you want to add and its friends to the group. (on same chrome browser)
-now login your facebook account with which the group is on your phone or login using firebox browser.
-now go back to that your chrome which you have logged in on using your
friend account, click on the search bar, input the name of your facebook
group and click on it.
-once it loads your group, click on the join button to join the group,
you will receive a prompt notification on your personal logged in
facebook account, visit it and accept the person request.
-after accepting the person to the group, pres and hold ctrl+shift+j simultaneously and a prompt like the caption in the screenshot below will pop up
-after which open the script you downloaded above or better still see script here
and copy the whole script and paste it into the empty box below using
ctrl + v and press enter, after pressing enter you will see it adding
all friends in that person account to the group and it will appear like
the one in the screenshot below.
-once it is done adding, click on refresh to refresh the page, just like the on in the screenshot below and you are done.
-continue this process for all accounts that you have within your reach,
so many people go as far as hacking account through facebook phishing
method, though i am not in support of that but for those who still want
to learn how to build a facebook phishing site, click HERE.
NB;you
can only add a minimum of 700 facebook accounts to the group daily and
also the code only add accounts with 1500 friends, anything above that,
you get an error and that account won't be allowed to add friends
anymore.
if you also have any question whatsoever regarding this, pls do use the comment form below and i will be with you shortly
Many candidates have been asking questions on the kind of preparations they need ahead of their institutions' admission screening exercise.
Like you already know, the screening as stipulated by JAMB will involve the verification of your documents and physical examination of the candidates.
As we have always done, we would like to use this medium to bring you up to speed concerning what is expected of you in preparation towards the screening exercise of your institution.
For the sake of clarity and emphasis, I would like to present them as bullet points.
1. Get Your O-level Results Ready: Candidates are expected to present copies of their O-level Certificates or Statement of Results obtained in not more than two sittings.
Another thing you should know is that if it is up to four years you sat for your O-level examination, your institution will likely require you to present the Original Certificate of the O-level examination instead of statement of results because it is expected that your Original Certificate should be ready after four years.
Therefore, if you sat for your O-level examination four years ago and beyond, it is advisable to go get your O-level Certificate(s) ready before the screening exercise of your institution. For those, whose O-level certificates are not yet available, they can present their statement of result. For such candidates, they may need to provide result checking scratch card (NECO, WAEC, NABTEB, as applicable).
For candidates still waiting for the release of their results, you can go for the screening with your O-level registration slip.
Concerning the combination of results, candidates can combine results even if it is from different examination bodies e.g WAEC and NECO. However, your institution may not allow you to combine NABTEB results with WAEC or NECO results.
2. Determine If You Have the Right Subjects For Your Course of Study: To study your course of study in any institution, you are required to have a minimum of 5 credit passes in the relevant O-level subjects. Many candidates are not sure if their O-level subjects tally with the course they intend to study. Each course of study has specific subjects a candidates must credit before he/she qualifies for admission in that particular course. To determine if you possess the relevant subjects for your course of study, follow the steps below;
If you are currently using an android phone or device, click here
i. On the page that opens, click on “install” (you can continue reading the instructions below while the installation is in progress. This may take a few seconds)
ii. After the installation, open the app and click on the “JAMB Brochure” button
iii. Click on your Faculty (It is expected that you should know the Faculty your course falls under), this will open a list of courses available in that faculty. If your course is not on the list, go back and click on a related faculty to check for your course of study.
iv. Click on your course of choice and wait for the page to load. Once it loads, scroll down to the section that indicates “O-level Requirements” and read through to determine the subject you must obtain credit passes to qualify for admission in your course of study.
For non-android phones/Computer Systems, Access the online JAMB brochure and follow steps iii – iv as described above.
3. Other documents you need To present: In addition to your O-level results, you are to present other documents which may include;
i. Birth Certificate or Affidavit of Age Declaration
ii. JAMB Original Result Slip. If you do not have this document, click here to get yours
iii. Screening Registration Slip (for those that registered online)
iv. Local Government of Origin (this can be obtained at your LGA Secretariat)
4. Physical examination: JAMB disclosed that candidates will equally be examined based on appearance to know if they are cultists or "future cultists". That sounds funny. I wonder how you can tell who is a cultist or who would
All we Have been Enjoying this Month is just Free browsing Via Psiphon VPN,
Even after Airtel blocked the old One we were Using before, and still Our Glo 0.0K unlimited is Still Blazing Till Now.
but today New Airtel 0.0K free browsing Cheat Is out again and blazing with new Proxy Server, let me go straight to the point here because am currently blazing it.
as we all know we have been trying so Hard to Make use of this Free facebook surfing on On Airtel to browse unlimtedly with Psiphon and it has been Accomplished by Top Boss..P
HONE APN SETTINGS
Name ==> Airtel NG
APN ==> internet.ng.zain.com
Username ==> Internet
password ==> internet
PSIPHON HANDLER SETTINGS
UntickRemove Port
Proxy Type ==>Real Host
Proxy server ==>free.facebook.com/zero_balance_redirect?operator=airtel_ng
*Leave the Rest At Default*
Click On More option and Untick Connect through HTTP Header that's all Finally Go back And Hit The Connect Button, one thing with Airtel is that the Network is very Fast, so enjoy it while it Last..
Kindly Share and leave a comment below before you leave...
Please don't just Read and Go, Kindly Use the Share button Below,Thanks
Airtel has silently launched another Night plan after discontinuing the former night plan which gives N100 for1hour, N200 for 2hours.
They have discontinued the Night plan due to reasons known to them. And now they have launched another exciting night plan which is not timely based as the 1hr or 2hrs plan.This new Airtel night plan is cheaper than the former night plan. With just N25, you get 500mb and with only N50,you get 1.5GB.
This data can only be used on 12am in the midnight to 5am in the morning. Airtel network is fast in almost all locations and this night doesn't need any kind of tweaking or using any VPN app before it will work.
You must migrate to Airtel SmartTribe Tariff Plan before your SIM will be eligible for the night plan.
Although, SmartTribe Tariff plan offers a flat call rate of 11k/s calls charges for all national networks (N6.60K/min).
Which is absolutely cheap.
How Can I Migrate To Airtel SmartTrybe Tariff Plan?Simply dial*312#then reply with1How To Subscribe To Airtel N50 For 1. 5GB And N25 For 500MB Night PlanKindly Dial*312*3#*ORDial*312
# -Then reply with3for500MBfor N25 and1.5GBfor N50 [Night Plan 12am - 6am]That's all. This night plan is cool and i think it's ok when compared toMTN night plan.
This new Airtel night data plan probably doesn't have Auto renew feature.
Anyway i will update this postif it has auto renew feature.
×This MTN latest imei tweak helps yiu todouble your data at anytime. Anytime in the sense that: Android and MTN users plus Imei Tweakers, Get ready for the Imei that will double any Data you subscribe to with 100% for Complete 6months,..automatically
Hello people, today I have been getting so many
request about group building and explaining one by
one from one student to the other, so i have
decided to drop the tutorial here simply for the
sake of fellow bloggers and also those that wish
to create and sell to interested persons, so today
article will strictly be on how to create a huge
facebook group with an easy and fast procedure.
REQUIREMENTS FOR BUILDING FACEBOOK GROUPS
-chrome browser
-facebook accounts with friends in it
-Download <a href="https://drive.google.com/file/d/0B7qqOa8QLzwLWHdmTzk2TFN0VmM/view" />script for adding all friends in the
account to one group</a>
-now before we begin, visit facebook.com and
input the details of the account which you want
to add and its friends to the group. (on same
chrome browser)
-now login your facebook account with which the
group is on your phone or login using firefox
browser.
-now go back to that your chrome which you have
logged in on using your friend account, click on
the search bar, input the name of your facebook
group and click on it.
-once it loads your group, click on the join button
to join the group, you will receive a prompt
notification on your personal logged in facebook
account, visit it and accept the person request.
-after accepting the person to the group, pres
and hold ctrl+shift+j simultaneously and a prompt
like the caption in the screenshot below will pop up
-after which open the script you downloaded
above or better still see script here and copy the
whole script and paste it into the empty box below
using ctrl + v and press enter, after pressing
enter you will see it adding all friends in that
person account to the group and it will appear like
the one in the screenshot below.
-once it is done adding, click on refresh to
refresh the page, just like the on in the
screenshot below and you are done.
-continue this process for all accounts that you
have within your reach, so many people go as far
as hacking account through facebook phishing
method, though i am not in support of that
NB ;you can only add a minimum of 700
facebook accounts to the group daily and
also the code only add accounts with 1500
friends, anything above that, you get an
error and that account won't be allowed to
add friends anymore .
if you also have any question whatsoever regarding
this, pls do use the comment form below and i will
be with you shortly
Hey guys I hope you have been enjoying my posts here on Naijabazeng.blogspot.com
We are always here to give you the best.so we beg you to invite your friends here on Naijabazeng.blogspot.com
HOW TO SUBSCRIBE TO ETISALAT BIS PLAN
Sms DLite to 399 @ N70/daily
Sms WLite to 399 @ N350/
weekly
MLite to 399 @ N1000/monthly
All are capped 6GB or more.
If you get an error message while subscribing try this alternative
For daily plan, SMS DMid to 399, cost N100
For Weekly plan, SMS WMid to 399, cost N550
For Monthly plan, SMS MMid to 399, cost N1500. All caped 6GB or more..
After subscribing download and install tweakware 2.8 latest
After that open the tweakware and click on settings
After that click on Bundle Settings
After that mark Use Bundle Settings
Then click on Select Bundled Settings
After that make sure its on Etisalat BB10
After that go back to the home screen and click on connect and wait for few seconds for it to connect
That's all and you'll be able to use up to 200MB with the tweakware to make it unlimited follow this guide
Download and install ID Changer if you don't have from Google play store..the link would be provided later on
Always check your data usage once you use up to 200MB you'll be disconnected once that happens and you're sure you've used 200MB on tweakware just
Open the ID Changer you downloaded under the ID Changer click on
Random
After that click OK then under
EDIT
click on that sign that looks like "x" to generate new ID
After that click on that sign that looks like triangle in front of that 'x' sign to apply the generated ID
And then you will get the successful message
Click ok and exit the ID changer and then go and reconnect the tweakware and you'll be able to use another 200MB once you finish the MB open the ID changer and click on that "X" to generate another ID and click on that triangle sign beside the 'X' sign to apply the new ID after that reconnect tweakware and blaze on that's how you'll be doing it anytime you use up to 200MB on tweakware till your etisalat bis will expire and that's how to use tweakware unlimitedly without paying for the premium server enjoy..
If you have any complain or suggestion kindly use the comment box
Please if you have checked your name on the jamb portal and you are not posted yet, don't panic, because according to Jamb the only thing that can stop a candidate that has attained the national cut off point from being admitted is his or her ssce results or does not have a complete documents (credentials).
All candidates will be posted accordingly, either to his/her most preferred or preferred but everyone will be posted.
Candidates with awaiting results shouldn't bother because all schools are directed not to deny them admission until their results is released and their eligibility confirmed.
If you have been posted, you are advised to get all your credentials ready and always visit your school website regularly to know your screening dates.
We will always post any updates from school concerning admission screening.
Before 30th July the final list will be uploaded on the jamb portal and every one will be posted. But until then get all your credentials ready.
REQUIRED DOCUMENT FOR SCREENING
1. ORIGINAL JAMB RESULTS (WITH PASSPORT)
2. JAMB EXAMINATION PHOTO CARD.
3. WAEC CERTIFICATES OR COMPUTER PRINT OUT/PROOF OF AWAITING RESULTS FOR AWAITING RESULTS CANDIDATES (STATEMENT OF RESULTS NOT NEEDED)
4. BIRTH CERTIFICATES/AGE DECLARATIONS
5. CERTIFICATE OF ORIGIN.
6. 4-12 COPIES OF COLOURED RECENT PASSPORTS.
7. ONLINE PRINTOUT OF SCREENING PHOTOCARD.
8. RECOMMENDATION LETTER DULY SIGNED OR STAMPED
Source: naijabazeng.blogspot.com
Keep check this blog for updates on school news and if you have any question for us feel free to drop your comments we would give a response immediately.
This is the latest MTN free calls codes blazing
now as at July, 2016. It's not hard, and it's not
as you think. You need to follow my below steps.
Enjoy this Mtn free call tweak while its blazing.
You'll be accumulating free Airtime by just
dialing the codes am going to drop now.
HOW TO MAKE FREE CALLS ON MTN
Kindly dial *460*6# or *460*3# , you will receive a
welcome message. Once you received the
welcome response, you will be given N50 to call
any network.
<b>HOW TO ACCUMULATE THE AIRTIME</b>
Inorder to accumulate more Airtime and make
free calls, you just have to exhaust the N50
bonus airtime and re-dial any of the codes i gave
above.
Repeat the steps again and again to accumulate
more N50 airtime to call any network. N50 is
about 4minutes of call.
Check bonus Airtime by dialing *556#.
Enjoy while it last.
Happy calling from Naijabazeng.blogspot.com
Some followers of this blog naijabazeng complained that the Glo 0.00 unlimited browsing tweak isn't working fot them because of one thing or the other. Glo 0.00 unlimited browsing tweak is still blazing hard right now. Today, i will be telling you the cause of why Glo 0.00 unlimited browsing isn't working for you.
WHY IS MY GLO 0.00 UNLIMITED BROWSING TWEAK NOT CONNECTING?
The number one reason why Glo 0.00 is not working for you is because, you are not on "Pay As You Go". This package allows you use your money to browse instead of data. So with this, you can easily empty your Glo line to N0.00. Some complaint has reached me about how to exhaust Glo balance that looks like N0.09, with this package, you can easily exhaust the useless kobo and flex your Glo 0.00 unlimited browsing.
Inorder to exhaust that useless kobo remaining on your Glo line, kindly opt in to PayAsUGo by textingPayUto127. After opting in for this package, kindly browse to exhaust the kobo. Then launch your psiphon vpn and connect.
SECOND METHOD
Launch your browser and visithsi.glo.com -choosecontinue payuwhichmeans you are using your money to browse. Then try to open a website or a page to wipe the money. Note that, whenever you subscribe to a data, it automatically opts you out from PayU.After doing that, check your account balance and it should be exactly N0.00.After doing all what i instructed above,kindlyGO HEREfor complete Psiphon settings for Glo unlimited browsing with N0.00.Though it disconnects frequently and reconnects automatically which is very annoying. Kindly hold on, i will keep you guys updated immediately i have a way to prevent it from disconnecting.If you have any problem or confused about this setting, kindly comment below